Bathroom Flooring | Options and Installation Overview
Explore the key steps for selecting and installing bathroom flooring—from evaluating subfloors and choosing materials to proper installation and final inspection. Contact Simone Feldman Designs today.
Bathroom Flooring Process at a Glance
Great bathroom flooring starts long before installation day. The most durable, water-ready results come from early planning, on-site moisture checks, deflection measurements, correct substrate specification, material selections, ordering, scheduling, and coordination among skilled installers.
For homeowners in Roswell, Atlanta, and nearby neighborhoods, understanding the flooring process reduces stress and prevents costly do-overs. While every space is different, a professionally managed bathroom flooring project usually follows clear phases: consultation, substrate evaluation, design and material selections, ordering, permitting when required for structural work or radiant heat, installation, and final walkthrough.
Simone Feldman Designs leads each step with technical precision. With more than 40 years in renovation and design, Simone brings careful planning, hands-on oversight, and clear communication to flooring upgrades in bathrooms and powder rooms across the metro area. As a Certified Kitchen and Bath Designer (CKBD) and Certified Aging-in-Place Specialist (CA
Typical Timeline for Bathroom Flooring Installation
The actual installation of bathroom flooring can take a few days, but the full timeline typically extends when you include subfloor prep, design decisions, lead times, and scheduling for trades—especially if radiant heat or waterproofing membranes are part of the scope.
Smaller powder rooms with straightforward substrates move faster than large primary baths. Projects that add uncoupling membranes, self-leveling underlayment, radiant heat mats, intricate tile layouts, or stone sealing require additional time for prep, curing, and inspections.
Your bathroom flooring schedule can also be affected by:
- The size of the room and condition of the existing subfloor
- Whether multiple bathrooms are being updated
- Subfloor deflection readings and needed reinforcement
- Plumbing adjustments that change floor height at drains
- Permit and inspection requirements for radiant heat
- Material availability and lead times
- Custom patterns, mosaics, or borders
- Waterproofing and membrane requirements
- Glass shower or threshold coordination impacting tile cuts
- Hidden moisture damage discovered during tear-out
- The availability and sequencing of tile setters and electricians
Rather than focusing only on the days of installation, consider the full project lifecycle. Upfront substrate testing, precise material choices, and early ordering help avoid preventable delays, last-minute compromises, and change orders once work begins.


Assessing Your Space and Subfloor Requirements
The bathroom flooring process starts with a conversation about your space, performance expectations, budget, and any problems you’ve noticed—such as loose tiles, soft spots, cracked grout, or slippery surfaces.
During the initial consultation, Simone Feldman Designs reviews how you use the room and how moisture behaves in the space. We’ll discuss concerns like cold floors, grout staining, uneven transitions, pet or family traffic, slip resistance, radiant heat goals, and maintenance preferences for tile, LVP, sheet vinyl, or natural stone.
This stage is also the time to clarify scope. Homeowners should be prepared to share:
- Inspiration images and finish preferences
- Must-have performance features (warmth, texture, easy cleaning)
- Household needs, including kids, guests, or aging-in-place planning
- Budget expectations
- Whether floor heights must align with adjacent rooms
- Any known leaks, prior water damage, or subfloor concerns
- A desired completion window, if one exists
A clear conversation early on sets expectations and helps prioritize choices that deliver durability, traction, comfort, and long-term value.
Subfloor Prep, Deflection Limits, and Leveling
Before choosing tile or vinyl, the foundation must be right. This phase includes moisture readings, subfloor flatness checks, joist span and deflection calculations, and decisions on cement board, foam backer, self-leveling underlayment, or uncoupling membranes.
Bathroom flooring planning goes beyond material style. It determines how the assembly manages water, movement, and temperature changes for years to come.
A well-prepped bathroom floor may consider:
- Door clearances and threshold height transitions
- Slip resistance needs (DCOF) for wet areas
- Tile size layout and grout joint planning
- Shower entry details and curbless transitions
- Heated floor compatibility and thermostat location
- Flatness requirements for large-format tile
- Moisture testing for concrete slabs
- Sound and crack isolation needs for condos
- Toilet flange height after new floor build-up
- Vent and register coordination
- Lighting reveal on tile lippage and surface texture
- Accessibility and future mobility considerations
In compact baths, correct prep can make big tiles lay flat and minimize grout lines. In larger primary suites, we may add uncoupling membranes, radiant heat, movement joints, and careful layout to balance aesthetics with performance.
Simone Feldman Designs uses 3D visuals and layout drawings to preview tile patterns, transitions, and heat zones before work begins, helping you understand scale, grout spacing, and edge profiles.
Selecting Tile, LVP, and Stone with Performance Specs
With the substrate plan set, we finalize materials and installation details. This is where appearance and performance come together for wet-room durability.
Selections may include:
- Porcelain or ceramic floor tile
- LVP or sheet vinyl for seamless moisture protection
- Natural stone with appropriate sealing cycles
- Heated floor system and thermostat
- Uncoupling or crack-isolation membrane
- Cement board or foam backer
- Grout type and color (sanded, unsanded, or epoxy)
- Trim profiles and thresholds
- Drain and flange adjustment components
- Movement joints and expansion details
- Adhesives, mortars, and setting materials suitable for wet areas
- Slip-resistance targets based on DCOF
- Flooring transitions to adjacent rooms
- Sealers and maintenance products
Every decision supports your goals for safety, comfort, and maintenance. For example, porcelain often offers superior density and low water absorption compared to ceramic, while LVP and sheet vinyl can provide warm, resilient surfaces with minimal upkeep. Natural stone delivers organic beauty but requires sealing and careful cleaning practices.
Ordering early is essential—membranes, radiant heat kits, specialty trims, and large-format tile can have lead times. Securing materials in advance keeps installation on schedule.
Simone guides homeowners through technical selections, explaining how each material behaves in real bathrooms and how choices affect durability, slip resistance, cleaning, and long-term satisfaction.
Estimating, Ordering, and Scheduling Your Install
Once your bathroom flooring concept is set and materials are chosen, Simone prepares a detailed cost breakdown, verifies installation requirements, places orders, and builds a dependable install timeline tailored to your home or condo.
This step matters because lead times for porcelain, LVP, stone, underlayments, and heated floor components determine when old flooring can be removed. Tearing out finishes before key products arrive can leave your bathroom without a safe walking surface longer than necessary.
For bathroom flooring, this planning stage may include:
- Confirming labor and installation costs
- Ordering tile, LVP or sheet vinyl, trims, membranes, and setting materials
- Reviewing product lead times
- Coordinating specialty materials
- Finalizing plans for radiant heat and thermostat power
- Scheduling trades
- Applying for permits, when required
- Preparing for inspections
- Establishing a construction start date
Permits may be required when adding radiant heating, altering electrical circuits, or addressing structural items such as subfloor reinforcement to meet tile deflection limits. Review and inspection timing can influence the schedule, especially with heated floors or subfloor upgrades.
At Simone Feldman Designs, careful planning aligns product choices with best-practice installation. Simone coordinates flooring installers, electricians, and other trusted pros so the substrate, membranes, heat, and finishes come together correctly and on time.
Site Protection and Moisture Controls Before Work Begins
Before installation begins, expect short-term disruption. If this is your only full bathroom, plan how you’ll manage showering and safe passage while flooring is removed, leveled, and set.
Preparation may include:
- Removing personal toiletries, medications, towels, and décor
- Clearing nearby hallways and access paths
- Relocating fragile items from adjacent rooms
- Creating a temporary grooming station elsewhere in the home
- Planning bathroom use around water shutoffs
- Discussing pet access and household schedules
- Protecting furniture or belongings near the work area
- Confirming parking, entry, and access expectations with the project team
Floor replacements generate dust, noise, and foot traffic, and may include brief power shutoffs for radiant heat wiring. A professional team should outline the daily sequence—subfloor prep, leveling, membrane installation, tile or vinyl placement, grout, and cure times—so you know when floors can be walked on.
Simone remains engaged throughout installation, visits the site regularly, and keeps you updated on progress, drying and curing windows, and any adjustments that protect performance and schedule.
Tear-Out, Subfloor Repairs, and Underlayment Install
Flooring work starts with removing existing finishes—tile, vinyl, or wood—along with damaged underlayment. This reveals the true condition of the subfloor and framing, which is critical for long-lasting bathroom floors.
Once demolition begins, the team may uncover moisture-damaged sheathing, mold concerns, uneven or sloped substrates, squeaks, or framing that does not meet tile deflection limits. Older homes may also reveal previous patchwork that requires correction before new surfaces go down.
Not every project encounters these issues, but a smart budget and schedule should include contingencies. Correcting problems—rather than covering them—prevents cracked tile, loose LVP seams, hollow spots, or failed grout.
After demolition, rough construction may include:
- Framing changes
- Plumbing rough-in work
- Electrical wiring and outlet placement
- Ventilation ducting
- Blocking for grab bars, accessories, cabinets, or shower glass
- Shower pan preparation
- Wall repairs or replacement
- Subfloor repairs and leveling
This stage sets the foundation for performance: reinforcing joists when needed, installing cement board or an uncoupling membrane, and using self-leveling underlayment to achieve flatness specifications for large-format tile or continuous LVP planks.
Waterproofing, Uncoupling Membranes, Heat, and Tile Setting
Bathroom floors demand moisture management. While tile and grout are attractive, true protection comes from the system beneath—membranes, proper thinset, and correct transitions. For LVP or sheet vinyl, seams, perimeter sealing, and substrate prep are equally important to keep water out of the subfloor.
Depending on your selected flooring, this phase may involve:
- Installing a waterproof shower pan or system
- Preparing shower walls
- Applying waterproofing membranes
- Conducting flood testing when appropriate
- Installing floor tile
- Setting wall tile and shower tile
- Grouting and sealing materials as needed
- Installing a vanity and countertop
- Completing flooring transitions
- Painting walls and ceilings
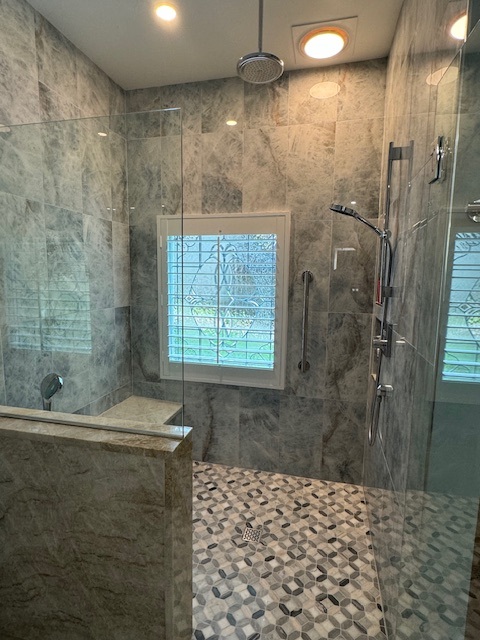
For tile floors, Simone specifies appropriate mortar, trowel size, and grout type, and verifies DCOF slip-resistance ratings suited to wet areas. Natural stone receives pre-sealing when required and careful grout joint planning. LVP or sheet vinyl installations focus on flawless substrate smoothing and tight, watertight transitions at tubs and showers.
Simone Feldman Designs coordinates skilled installers to execute heated floor mats, uncoupling membranes, and large-format layouts with straight lines, proper movement joints, and clean thresholds—delivering a bathroom floor that’s beautiful, safe, and built to last.
Grout, Sealing Stone, and Finish Details
With the flooring installed and cured, attention turns to protection and finishing touches that elevate performance and appearance.
Typical finishing work may include:
- Installing faucets, shower trim, and toilets
- Hanging mirrors and light fixtures
- Connecting sinks and drains
- Installing cabinet hardware
- Mounting accessories
- Installing shower glass
- Completing paint touch-ups
- Testing lights, outlets, fans, drains, and plumbing fixtures
- Cleaning the space for final review
Tile floors are inspected for lippage and grout consistency, stone is sealed as needed, and radiant systems are tested before setting thermostats. For resilient floors, Simone confirms tight transitions at doorways and wet zones to prevent edge swelling.
Quality Check, DCOF Slip Testing, and Care Handover
The final walkthrough focuses on how the new floor looks, feels underfoot, and performs when wet. Together we review slip resistance, cleaning methods, and the maintenance schedule that keeps your finish in top shape.
During the final review, homeowners should understand:
- How to operate plumbing fixtures and exhaust fans
- How to care for countertops, tile, grout, and specialty surfaces
- Whether any materials require sealing or specific cleaners
- How to maintain shower glass and hardware
- What warranty information applies to products or workmanship
- Which final touch-ups or punch-list items, if any, remain
We also cover grout and stone sealing intervals, safe cleaners for LVP and sheet vinyl, and when to activate radiant heat after curing. A clear handoff ensures your bathroom flooring is safe, durable, and easy to maintain from day one.
What Can Speed Up or Delay a Flooring Install
Bathroom flooring projects vary. Even with careful scheduling, timelines can shift due to substrate discoveries, backorders, inspection timing for heated floors, or design changes after work begins.
Common reasons a bathroom flooring project may take longer include:
- Changes to the scope after work begins
- Delayed tile, stone, LVP, membranes, or heat components
- Backordered or damaged materials
- Custom fabrication timelines for thresholds, stone sills, or trims
- Permit and inspection scheduling
- Hidden moisture, framing, or electrical issues for radiant heat
- Structural repairs or subfloor deflection corrections
- Complex tile layouts or large-format leveling requirements
- Weather-related scheduling challenges for certain deliveries or exterior access needs
- Homeowner selection changes during construction
Minimize delays by finalizing selections early, ordering critical components before demo, allowing curing time for self-leveling underlayment and mortar, and partnering with Simone for expert coordination from substrate prep through final seal and walkthrough.
Start Your Bathroom Floor Project with Confidence
Choosing bathroom flooring is more than picking a pretty tile—it's about moisture management, durability, and day-to-day comfort. A successful installation follows a thoughtful sequence: evaluate the subfloor and deflection, level as needed, select materials with the right slip resistance (DCOF), and install with proper membranes, setting materials, and sealing where required.
Simone Feldman Designs guides homeowners in Roswell, Atlanta, and nearby neighborhoods through every flooring decision. With 40+ years of residential renovation experience, Simone helps compare porcelain versus ceramic tile, LVP versus sheet vinyl, and natural stone options; specifies cement backer board or uncoupling membranes; coordinates heated floor systems; and oversees skilled installation for long-term performance.
If you’re exploring new bathroom flooring, contact Simone Feldman Designs to schedule a consultation and develop a clear, build-ready plan tailored to your home and lifestyle.