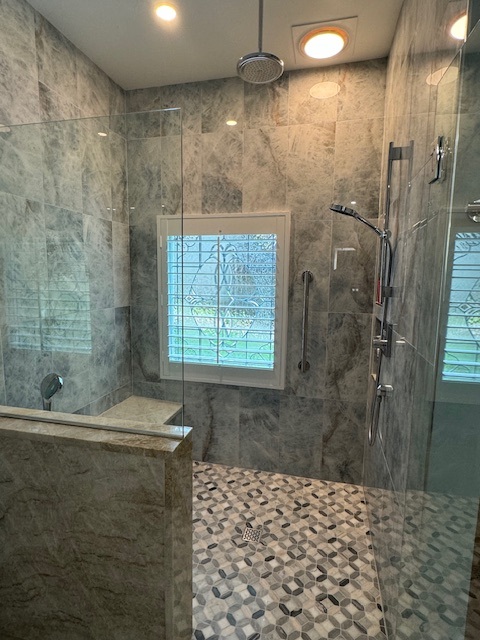
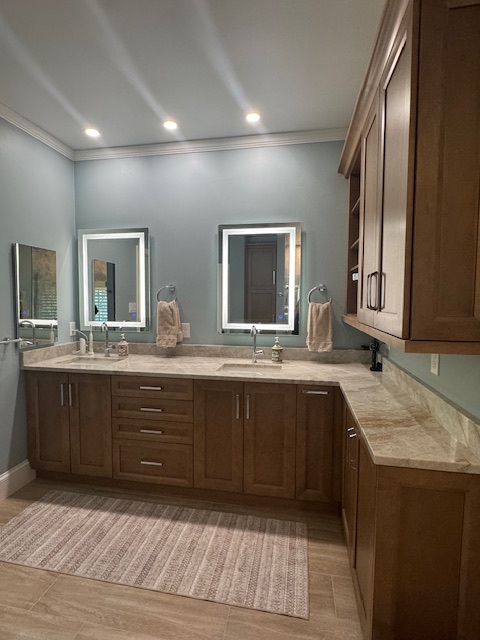
Bathroom Lighting Overview and Goals
Explore how a cohesive Bathroom Lighting plan comes together—from concept and product selection to safe installation and final aiming. Contact Simone Feldman Designs today.
End‑to‑End Bathroom Lighting Workflow
Exceptional bathroom lighting doesn’t start at fixture day. The most successful results begin weeks—or sometimes months—earlier with measured planning, photometric thinking, code-aware electrical coordination, product vetting, ordering, and trade scheduling.
For homeowners in Roswell, Atlanta, and nearby neighborhoods, understanding how a layered lighting plan unfolds reduces stress and ensures balanced illumination at the vanity, in the shower, and across the room. While every bath is different, a professional lighting process typically follows clear phases: consultation, lighting goals and measurements, fixture and control selections, ordering, permitting when required, electrical rough-in, installation and aiming, and final tuning.
Simone Feldman Designs leads clients through each step. With more than 40 years in renovation and design, Simone brings precise planning, hands-on oversight, and clear communication to bathroom lighting projects. As a Certified Kitchen and Bath Designer (CKBD) and Certified Aging-in-Place Specialist (CA
Typical Timeline for a Bathroom Lighting Upgrade
The on-site electrical and fixture installation may be completed in days, but the full process often runs longer once design, product selection, ordering, and scheduling are included.
A simple refresh—such as replacing a vanity light and adding dimmers—moves faster than a full lighting overhaul. Projects that introduce multiple zones, relocate wiring, add recessed or cove lighting, include wet-rated shower fixtures, or integrate smart controls generally require more planning and time.
A bathroom lighting timeline can also be affected by:
- The size and existing wiring condition
- The number of bathrooms being updated
- Whether fixture locations or switching will change
- Electrical load calculations and circuit upgrades
- Permit and inspection requirements
- Fixture availability and lead times
- Custom mirror or backlit mirror fabrication
- Ceiling access and insulation (e.g., IC-rated can requirements)
- Shower glass timing that impacts fixture placement and aiming
- Hidden conditions discovered after opening walls or ceilings
- The availability and sequencing of licensed electricians
Rather than focusing only on installation days, consider the entire project lifecycle. Thorough planning helps prevent last-minute fixture substitutions, avoidable delays, and costly changes once wiring is in place.


Phase 1 Lighting Interview and Code Review
A successful bathroom lighting project begins with a conversation about your space, your routines, your budget, and the lighting frustrations you face every day.
During the initial consultation, Simone Feldman Designs evaluates sightlines, mirror placement, natural light, and existing circuits. We’ll discuss concerns such as shadows at the vanity, glare on mirrors, dim showers, cold or harsh color temperature, insufficient switching, lack of dimmers, or fixtures without proper wet-location ratings.
This stage is also the time to define scope and performance goals. Homeowners should be prepared to share:
- Inspiration images and aesthetic preferences
- A list of must-have lighting zones (vanity, ambient, shower, night light)
- Household needs, including makeup application, shaving, or aging-in-place goals
- Budget expectations
- Whether fixture locations or switching will change
- Any known moisture issues, GFCI concerns, or code items to address
- A desired completion window, if one exists
A clear conversation up front sets expectations and identifies which lighting investments—such as eye-level vanity lights, higher CRI lamps, or smart dimming—will deliver the most comfort, function, and long-term value.
Phase 2 Site Audit and Layered Plan (Task Ambient Accent)
Before choosing fixtures, the room needs a layered plan that balances task, ambient, and accent illumination while meeting code. This phase reviews dimensions, mirror widths, window positions, ceiling height, circuit capacity, switching locations, and ventilation clearances.
Thoughtful layout work considers how the light falls on faces, surfaces, and walls—not just where fixtures fit.
A well-designed bathroom lighting plan may consider:
- Vanity task lighting at eye level to minimize shadows
- Ambient lighting via recessed, surface-mount, or cove options
- Wet- or damp-location ratings for shower and tub zones
- Color temperature (Kelvin) and CRI for accurate skin tones
- Dimmer placement and zoning for morning vs. evening use
- Natural light and mirror strategies to reduce glare
- Night lighting paths for safety
- Outlet locations with GFCI where required
- Control compatibility for LED drivers and smart systems
- Clearances from insulation and IC-rated requirements
- Fixture spacing to avoid scalloping and hot spots
- Accessibility and future mobility lighting needs
In compact baths, precise fixture height, narrow-aperture downlights, and backlit mirrors can brighten the space without visual clutter. In larger primary baths, multiple scenes—task, ambient, and accent—create comfort and flexibility.
Simone Feldman Designs uses 3D visualization to preview beam spreads, reflection points, and fixture scale so clients can see how the room will feel before installation.
Phase 3 Fixture Specs Color Quality and Controls
Once the layout is set, we select fixtures and controls that deliver performance and style. Here, technical choices ensure great light quality and safe operation.
Selections may include:
- Vanity sconces or vertical bars at eye level
- Backlit or front-lit mirrors
- Recessed or surface-mount ambient lights
- Wet- or damp-rated shower fixtures
- LED color temperature and CRI specifications
- Dimmers, scene controls, and smart switches
- Night lights or toe-kick lighting
- GFCI-protected outlets and compatible drivers
- Trim styles and finishes that complement the vanity
- Beam angles and lumen output by zone
- Exhaust fan-light combinations where appropriate
- Transitions between natural light and artificial light
- Accessory placement that avoids glare at mirrors
- Mirror heaters or anti-fog options coordinated with lighting
Every specification should support the lighting goals, budget, and maintenance preferences. For example, 2700K–3000K with 90+ CRI typically flatters skin tone at the vanity, while a slightly cooler ambient option can help wake the room for morning routines. In-shower fixtures must be properly rated and located per code.
Ordering early is essential because certain mirrors, trims, and controls have longer lead times. Pre-purchasing ensures the electrician can rough-in and aim correctly once work begins.
Simone helps you compare fixture photometrics, finish durability, driver compatibility, and control options—so your bathroom lighting looks beautiful, performs reliably, and passes inspection.
Phase 4 Budget Procurement and Permits
With your bathroom lighting plan defined, Simone refines costs, confirms scope, orders specified fixtures, and sequences work so electricians and other trades can deliver a safe, code-compliant result.
Availability of lighting components can determine when electrical rough-in begins. Starting work before key luminaires, dimmers, or controls are confirmed can delay inspections and leave the bathroom without proper task lighting longer than necessary.
Depending on the project, the planning stage may include:
- Confirming labor and installation costs
- Ordering cabinets, tile, fixtures, lighting, and countertops
- Reviewing product lead times
- Coordinating specialty materials
- Finalizing plans for plumbing and electrical work
- Scheduling trades
- Applying for permits, when required
- Preparing for inspections
- Establishing a construction start date
Electrical permits are often required when adding circuits, relocating wiring, or installing new controls. Bathroom lighting near showers or tubs must meet wet or damp location ratings and be protected by GFCI where required. Plan for permit review and inspections when significant electrical changes or control zoning are part of the scope.
At Simone Feldman Designs, project planning includes coordinating licensed electricians and ensuring fixture specs, driver compatibility, and control locations align with the approved lighting design. Simone collaborates with carpenters, plumbers, tile installers, and other trusted residential professionals so junction boxes, mirror placements, and ceiling openings are set correctly the first time.
Phase 5 Pre‑Install Prep and Circuit Planning
Before lighting upgrades begin, expect brief disruptions while wiring is run, walls are opened, and power is cycled for testing. If this is your only full bathroom, plan for temporary grooming solutions while vanity lights or mirrors are removed.
Preparation may include:
- Removing personal toiletries, medications, towels, and décor
- Clearing nearby hallways and access paths
- Relocating fragile items from adjacent rooms
- Creating a temporary grooming station elsewhere in the home
- Planning bathroom use around water shutoffs
- Discussing pet access and household schedules
- Protecting furniture or belongings near the work area
- Confirming parking, entry, and access expectations with the project team
Electrical work can involve dust from small drywall openings, ladder use, and occasional power interruptions. Your team should explain when ceiling penetrations will occur, when vanity lights and mirrors will be removed, and which areas are safe to use between phases.
Simone remains closely involved, coordinating fixture deliveries, verifying box heights for eye-level vanity sconces, and keeping you informed about installation timing, inspections, and any adjustments that improve light quality and code compliance.
Phase 6 Rough‑In Wiring Boxes and GFCI/Dimmer Zones
Lighting-focused demolition often includes removing outdated fixtures, patching prior cutouts, and opening selective areas for new wiring, switches, and dimmer zones. This prepares the space for a layered plan with task, ambient, and accent lighting.
Once walls and ceilings are open, the team may uncover undersized junction boxes, lack of GFCI protection near sinks, non-compliant wiring in wet areas, or poorly placed vanity rough-ins that cause shadows at the mirror.
Not every project encounters these issues, but allow contingency for corrections. Fixing wiring, relocating boxes to eye level for sconces, and adding proper circuits for dimmable LEDs typically yields safer operation and better light quality.
After demolition, rough construction may include:
- Framing changes
- Plumbing rough-in work
- Electrical wiring and outlet placement
- Ventilation ducting
- Blocking for grab bars, accessories, cabinets, or shower glass
- Shower pan preparation
- Wall repairs or replacement
- Subfloor repairs and leveling
This phase is crucial for placing vanity junction boxes at eye level, setting ceiling locations for ambient cans or flush mounts, installing low-voltage drivers in serviceable spots, and confirming wet-rated fixtures within shower zones meet local code.
Phase 7 Wet Areas Sealing and IC‑Rated Can Placement
Surface work directly affects lighting performance. Gloss level, tile color, and mirror size can amplify or mute illumination. During this phase, Simone coordinates fixture clearances, backlit mirror recesses, and trimless openings so finishes and lighting integrate cleanly.
Depending on the bathroom design, this phase may involve:
- Installing a waterproof shower pan or system
- Preparing shower walls
- Applying waterproofing membranes
- Conducting flood testing when appropriate
- Installing floor tile
- Setting wall tile and shower tile
- Grouting and sealing materials as needed
- Installing a vanity and countertop
- Completing flooring transitions
- Painting walls and ceilings
Tile layout influences where sconces, niche lights, and ceiling fixtures sit. Precise coordination avoids cutting into mosaics, keeps fixtures centered on the mirror, and ensures wet-rated downlights align with grout joints for a refined look.
Simone Feldman Designs verifies box locations before tile is set, checks clearances for backlit mirrors and cove lighting, and confirms that paint color and sheen harmonize with chosen color temperature and CRI for accurate skin tones at the vanity.
Phase 8 Mounting Aiming and Backlit Mirror Setup
With surfaces complete, the lighting system takes shape. This step brings together vanity task lights, ambient ceiling fixtures, and subtle accents that highlight tile or architecture—all tuned to the right controls.
Typical finishing work may include:
- Installing faucets, shower trim, and toilets
- Hanging mirrors and light fixtures
- Connecting sinks and drains
- Installing cabinet hardware
- Mounting accessories
- Installing shower glass
- Completing paint touch-ups
- Testing lights, outlets, fans, drains, and plumbing fixtures
- Cleaning the space for final review
Expect final aiming and dimming setup: vanity sconces are leveled at eye height to minimize shadows, ambient lights are balanced across zones, and dimmers are programmed so late-night paths are soft while grooming levels are bright and even.
Phase 9 Testing Adjustments and Client Handoff
The walkthrough focuses on safety, usability, and light quality. Together we confirm that wet-location fixtures are properly rated, GFCI protection and controls operate as intended, and each zone delivers the right output for daily routines.
During the final review, homeowners should understand:
- How to operate plumbing fixtures and exhaust fans
- How to care for countertops, tile, grout, and specialty surfaces
- Whether any materials require sealing or specific cleaners
- How to maintain shower glass and hardware
- What warranty information applies to products or workmanship
- Which final touch-ups or punch-list items, if any, remain
We’ll also review color temperature and CRI choices, dimmer scenes for morning and evening, and strategies for maximizing natural light around mirrors so the bathroom feels bright, flattering, and efficient from day one.
What Can Speed Up or Delay Your Lighting Project
Lighting upgrades have variables beyond standard remodeling. Scheduling can shift due to fixture lead times, inspection availability, coordination with tile and mirror placement, or scope changes after rough-in.
Common reasons a bathroom remodel may take longer include:
- Changes to the scope after work begins
- Delayed cabinetry, tile, lighting, or plumbing fixtures
- Backordered or damaged materials
- Custom fabrication timelines for cabinets, countertops, or shower glass
- Permit and inspection scheduling
- Hidden plumbing, framing, moisture, or electrical issues
- Structural repairs
- Complex tile patterns or custom shower features
- Weather-related scheduling challenges for certain deliveries or exterior access needs
- Homeowner selection changes during construction
To minimize delays on lighting-centric projects, approve fixture schedules early, verify wet/damp ratings for shower and vanity zones, order dimmers and drivers ahead of rough-in, and work with Simone to coordinate mirror heights and ceiling layouts before finishes are installed.
Start Your Bathroom Lighting Plan with Confidence
Lighting shapes how your bathroom looks and functions every day. A smart plan goes beyond picking pretty fixtures—it balances task, ambient, and accent lighting, places vanity lights at eye level for shadow-free grooming, specifies safe wet‑location ratings, and coordinates dimmers and zones so mornings feel bright and evenings unwind softly.
Simone Feldman Designs creates code-compliant bathroom lighting layouts for homes in Roswell, Atlanta, and nearby neighborhoods. With more than 40 years designing residential spaces, Simone oversees fixture selection, Kelvin and CRI choices for natural skin tone, GFCI and wet‑rated requirements near tubs and showers, contractor coordination, and on‑site aiming and dimmer calibration.
If you’re rethinking a bath or vanity area, contact Simone Feldman Designs to schedule a consultation and develop a layered lighting plan that looks beautiful, performs flawlessly, and meets local code.