Bathroom Tile Guide | Materials Patterns and Waterproofing
Explore how to choose and install bathroom tile—from selecting porcelain, ceramic, or stone to planning grout, patterns, and waterproofing for walls and showers. Contact Simone Feldman Designs today.
Bathroom Tile Timeline Overview
Beautiful tile work starts long before the first tile is set. Successful bathroom tile projects begin weeks—or sometimes months—earlier with site evaluation, precise measurements, substrate preparation, material selections, ordering, and skilled trade coordination.
For homeowners in Roswell, Atlanta, and nearby neighborhoods, understanding the tile planning process reduces stress and ensures a durable, watertight finish. While each bathroom is unique, a professional tile project typically moves through consistent phases: consultation, design and layout, material selection, ordering, substrate prep and waterproofing, tile setting, grouting and sealing, and final walkthrough.
Simone Feldman Designs guides homeowners at every step. With more than 40 years of renovation and design experience, Simone Feldman brings technical expertise in tile layout, moisture management, and finish details to walls, showers, and feature areas. As a Certified Kitchen and Bath Designer (CKBD) and Certified Aging-in-Place Specialist (CA
Typical Duration for a Bathroom Tile Installation
The tile-setting phase can span several days to a few weeks depending on scope, but the full timeline also includes design, material sourcing, substrate prep, waterproofing, and cure times for membranes, mortar, and grout.
Refreshing a small powder room wall may go faster than retiling a full primary shower with niches and a feature wall. Projects involving large-format tile, custom mosaics, complex patterns, stone fabrication, or shower waterproofing generally require additional planning, dry layouts, and careful installation.
A bathroom tile schedule can also be affected by:
- The size and condition of existing surfaces and backer boards
- The number of areas being tiled (walls, shower, floors, niches)
- Whether layout patterns require dry fitting or specialty cuts
- Plumbing fixture locations and valve heights that impact tile layout
- Permit and inspection needs for shower pans or liners
- Tile, trim, and accessory availability and lead times
- Custom stone thresholds, shelves, or benches
- Waterproofing method and cure times
- Shower glass coordination with tile reveals and mounting
- Hidden substrate or moisture issues uncovered during demo
- The availability and sequencing of tile installers and finish trades
Rather than counting only days on site, consider the full lifecycle: thoughtful design, timely ordering, and proper waterproofing prevent rushed choices, lippage, grout discoloration, or callbacks after installation.


Step 1 Consultation and Tile Goals
The bathroom tile process begins with a conversation about your space, moisture conditions, maintenance goals, and the style you envision for walls, showers, and accents.
During the initial consultation, Simone Feldman Designs evaluates surfaces and discusses performance needs. You may review topics like choosing porcelain vs. ceramic vs. stone, slip resistance for mosaic floors, grout color and type, waterproofing strategies for showers, and how to integrate niches or a feature wall without crowding the room.
This stage also sets the scope for tile work. Homeowners should be prepared to share:
- Inspiration images and preferred tile textures or finishes
- Must-have elements like a shower niche, bench, or mosaic border
- Household needs such as easy-clean surfaces or aging-in-place safety
- Budget expectations
- Which surfaces will be tiled: shower walls, floors, wainscot, or feature wall
- Any known moisture, grout staining, or leak concerns
- A desired completion window, if one exists
Clear conversation early on sets expectations and identifies which tile materials, sizes, and grout choices will deliver the best balance of beauty, traction, and long-term durability.
Step 2 Assess Substrates and Plan the Layout
Before selecting tile patterns or grout colors, the foundation must be right. This phase includes assessing framing, backer boards, shower pans, slopes, movement joints, lighting conditions, and how tile terminations will meet adjacent finishes.
Thoughtful tile planning considers more than square footage. It addresses sightlines, edge trims, cut placement, niche heights, grout joint alignment, and how the layout feels when viewed from the entry or mirror.
A well-developed tile plan may consider:
- Door sightlines and first-view feature walls
- Balanced cuts at corners and ceilings
- Vanity backsplash height and mirror coordination
- Shower dimensions, drain location, and niche placement
- Thresholds, transitions, and stone saddles if applicable
- Clearances around plumbing trims and accessories
- Natural light and how it highlights tile texture
- Towel hooks and shelving relative to grout lines
- Outlet and switch placements that avoid awkward tile cuts
- Appropriate backer board and waterproofing for wet areas
- Accessibility considerations like slip-resistant mosaics
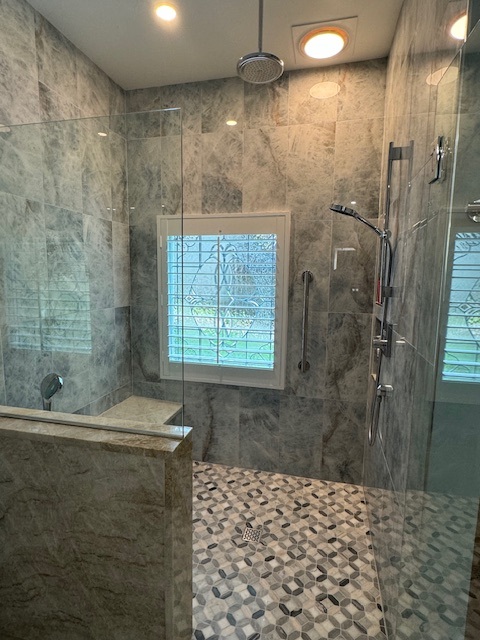
In compact bathrooms, strategic layouts—like vertical stack-bond on walls or larger tiles with minimal grout—can visually open the space. For primary suites, a feature wall, large-format porcelain slabs, or a recessed niche band can create a tailored, spa-like look.
Simone Feldman Designs uses 3D imaging to preview tile scale, pattern direction, grout joint spacing, and niche alignment so clients can approve details before installation begins.
Step 3 Choose Tile Grout and Waterproofing System
With layout set, selections refine both aesthetics and performance. Simone guides clients through tile type, size, edge profile, grout, and the best waterproofing system for the shower or wet wall.
Selections may include:
- Porcelain, ceramic, or natural stone tile
- Large-format panels, subway, or mosaic sheets
- Niche tile, accent bands, or feature-wall textures
- Edge trims and profiles (bullnose, Schluter-style metal trims)
- Epoxy, cementitious, or pre-mixed grout and color
- Sealants and stone sealers, if required
- Backer board and waterproofing membranes
- Thresholds, shelves, and corner shelves
- Shower glass style and hardware coordination
Every choice should support performance and maintenance. For example, large-format tiles offer a streamlined look but require flat substrates and lippage control; shower floors benefit from small mosaics for traction and drainage. Grout type matters too—epoxy resists staining in busy showers, while cementitious options may need sealing.
Ordering early keeps schedules on track, especially for specialty trims, mosaic accents, or large-format slabs with matching bullnose. Simone helps compare tile performance, grout upkeep, and waterproofing methods so your bathroom looks great and stays protected for years.
Step 4 Estimating Ordering and Permitting
With your bathroom tile design finalized—materials, sizes, patterns, grout, and trim pieces selected—Simone develops precise takeoffs to verify square footage, waste factors, edge profiles, and specialty components so installation hours and material quantities are accurately estimated.
This step is critical because tile availability, trim profiles, and grout colors often have lead times that dictate when demolition and waterproofing can begin. Tearing out a shower before the correct tile, membranes, and setting materials are on site can extend the period your bath is out of service.
For bathroom tile projects, planning typically includes:
- Confirming labor for surface prep, waterproofing, setting, and grouting
- Ordering tile, bullnose/edge trims, grout, membranes, and setting materials
- Reviewing manufacturer lead times for large-format and stone
- Coordinating specialty items like niches, schluter profiles, and heated floors
- Finalizing plumbing and electrical rough locations to suit tile layout
- Scheduling tile installers and related trades
- Applying for permits when moving drains, valves, or adding circuits
- Preparing for any required inspections
- Establishing a start date aligned with product delivery
Permits are not needed for every tile refresh, but they may be required when relocating shower valves, modifying drains, adding outlets for heated floors, or altering framing to support stone or large-format assemblies. Review times and inspections can influence the start date, especially when significant changes are planned.
At Simone Feldman Designs, planning centers on building a tile-first schedule—coordinating surface prep, waterproofing, and set crews—so craftsmanship and performance match the approved design. Simone works closely with tile setters, plumbers, electricians, and carpenters to ensure substrates, slopes, and layouts are correct before a single tile is set.
Step 5 Site Prep and Protection
Before tile work begins, expect a short period of disruption. If this bathroom is your only shower, arrange alternate bathing plans while waterproofing cures and grout seals. Protecting nearby rooms and planning access routes helps keep the rest of your home clean and safe.
Preparation may include:
- Removing toiletries, medications, towels, and décor from the bath
- Clearing halls and doorways to move tile boxes and substrates
- Relocating fragile items in adjacent rooms from vibration zones
- Setting up a temporary grooming area elsewhere
- Planning around brief water shutoffs for valve and drain work
- Discussing pet containment and household schedules
- Covering nearby furniture and flooring to control dust
- Confirming parking, entry paths, and delivery logistics with the team
Tile installation involves saws, cutting stations, and curing times that add noise and foot traffic. Your Simone team outlines the daily sequence—from substrate prep to membrane application and setting—so you know which trades are onsite and what to expect at each step.
Simone remains hands-on during installation, visiting routinely to verify layout sightlines, grout joint alignment, edge treatments, and that curing times are respected, while communicating schedule updates and any adjustments needed.
Step 6 Demolition and Substrate Repairs
Demolition starts with removing existing tile, shower surrounds, pans, backer boards, and damaged drywall to reach solid framing and subfloors ready for new assemblies.
Once surfaces are opened, hidden issues may appear: past leaks, mold, compromised studs, uneven subfloors, or outdated plumbing and wiring that could impact the new tile system’s longevity and alignment.
Not every project encounters surprises, but allow contingency in budget and schedule. Correcting structure, slope, or substrate flatness now prevents cracked grout, lippage, or loose tile later.
After demolition, rough work often includes:
- Framing adjustments for niches, benches, and feature walls
- Plumbing rough-ins for drains, valves, and showerheads
- Electrical placement for lighting and heated floors
- Ventilation ducting as required
- Installing solid blocking for grab bars and shower glass
- Shower pan construction and pre-slope
- Wall repair or new tile backer installation
- Subfloor repair and leveling for flatness
This stage determines tile performance: flat, properly sloped substrates and correctly installed backer and membranes are the foundation of a durable, watertight bathroom.
Step 7 Waterproofing Tile Setting and Lippage Control
In shower and tub areas, waterproofing is mission-critical. Tile and grout are wear surfaces, not the water barrier. A reliable assembly uses the right backer board, seams properly treated, a continuous membrane, and a watertight shower pan with correct slope to drain.
Depending on your tile plan, this phase may include:
- Installing a code-compliant shower pan or bonded waterproofing system
- Preparing walls with approved tile backer and flatness checks
- Applying liquid or sheet waterproofing membranes with seam detailing
- Flood testing the pan when specified
- Laying floor tile with attention to slip resistance, especially mosaics
- Setting wall and shower tile with proper trowel size and lippage control
- Grouting with the selected type and sealing as required
- Installing the vanity, top, and splash to coordinate with tile edges
- Completing clean transitions to adjacent flooring
- Finishing paint after tile and trim are complete
Precision matters: large-format pieces need flat substrates and tight tolerances to minimize lippage, while mosaics demand consistent spacing and drainage alignment at slopes, niches, and benches. Rushing risks uneven joints, poor weep protection, or compromised durability.
Simone Feldman Designs partners with dedicated tile craftsmen, checking layout starting points, grout joint symmetry, niche and feature-wall placement, and verifying that waterproofing thickness, cure times, and movement joints meet manufacturer guidance.
Step 8 Trim Caulk Sealing and Cleanup
With tile set and grouted, the bathroom’s character comes to life. This phase ties the tile work to the rest of the space with carefully fitted fixtures and complementary details.
Typical finishing work may include:
- Installing faucets, shower trim, and toilets with escutcheons aligned to grout lines
- Hanging mirrors and lights sized to sightlines established by the tile layout
- Connecting sinks and drains with splash protection where needed
- Adding cabinet hardware that suits the tile’s finish and scale
- Mounting accessories on solid blocking and within grout joints when possible
- Measuring, fabricating, and installing shower glass to clear tile returns
- Performing paint touch-ups after glass and accessories
- Testing lights, outlets, heated floors, drains, and fixtures
- Detail cleaning to remove haze and present the final finish
Custom shower glass is typically templated after tile is complete so reveals and hardware align perfectly with grout lines and wall planes—this added step often occurs near the end of the project.
Step 9 Final Inspection and Care Tips
During the walkthrough, Simone and the homeowner review the tile installation together—checking plane, grout color consistency, movement joints, sealant lines, and that niches, trims, and thresholds meet the approved plan.
By the end of the review, you should understand:
- How to operate fixtures and maintain proper ventilation during showers
- How to care for tile and grout, including approved cleaners
- Which grout type you have (cementitious, epoxy, or urethane) and sealing needs
- Best practices for maintaining shower glass and hardware near tile
- Applicable product and workmanship warranties
- Any final punch-list items scheduled for completion
A thorough sign-off ensures you know how to use and maintain your tiled bathroom from day one, protecting both beauty and performance.
Timeline Variables Material and Site Factors
Bathroom tile projects vary widely. Even with a detailed schedule, discoveries behind walls, product logistics, inspection timing, or mid-project changes can shift the timeline.
Common reasons tile work may take longer include:
- Scope changes after layout or setting has begun
- Delayed delivery of tile, trims, grout colors, or membranes
- Backordered, dye-lot mismatched, or damaged materials
- Custom fabrication for niches, benches, tops, or shower glass
- Permit or inspection schedules for drain and pan approvals
- Hidden moisture issues, uneven substrates, or outdated plumbing
- Structural or subfloor repairs to achieve flatness tolerances
- Intricate patterns, mosaics, or large-format tile requiring lippage control
- Weather impacts on deliveries or exterior access for debris removal
- Homeowner selection changes once setting has started
Minimize delays by finalizing selections early, ordering key materials before demolition, allowing a realistic contingency, and partnering with Simone to coordinate waterproofing, substrates, and tile crews from planning through completion.
Plan Your Bathroom Tile With Confidence
Tile sets the tone for your bathroom’s style and performance. A successful project goes beyond picking a pretty pattern—it requires choosing the right materials for walls, floors, and showers, planning a layout that aligns with sightlines, ensuring proper substrates and waterproofing, and executing a precise installation that controls lippage and delivers durable, easy-to-clean surfaces.
Simone Feldman Designs guides homeowners in Roswell, Atlanta, and nearby neighborhoods through every bathroom tile decision. With more than 40 years in residential remodeling, Simone helps you compare porcelain, ceramic, and natural stone; determine grout types and sealing strategies; coordinate large-format handling and mosaic slip resistance; and oversee installers so niches, feature walls, and trim details are executed exactly as designed.
If you’re exploring new bathroom tile, contact Simone Feldman Designs to schedule a consultation and develop a clear, step-by-step plan for materials, layout, and professional installation.