Curbless Showers Explained | Operation Suitability and Requirements
Explore how curbless showers are planned and built—from assessing slope-to-drain and waterproofing to glass, finishes, and final walkthrough. Contact Simone Feldman Designs today.
From Assessment to Installation A Curbless Shower Roadmap
A successful curbless shower doesn’t start on demo day. It begins well in advance with precise measurements, evaluating floor structure for slope, selecting a linear or point drain, choosing a waterproofing system, and coordinating trades so the bathroom floor and shower pan align seamlessly.
Homeowners in Roswell, Atlanta, and nearby neighborhoods benefit from understanding the steps unique to curbless builds. While each home is different, a professionally executed curbless shower follows predictable phases: consultation and feasibility, design and drainage planning, material selections, ordering, permitting where needed, structural prep and pre-slope, waterproofing and flood testing, tile and glass installation, and final review.
Simone Feldman Designs manages each detail from start to finish. With more than 40 years in renovation and design, Simone brings technical know‑how, on-site oversight, and clear communication to curbless conversions. As a Certified Kitchen and Bath Designer (CKBD) and Certified Aging-in-Place Specialist (CA
Typical Duration for a Curbless Shower Renovation
The installation of a curbless shower often spans several weeks, and the overall timeline typically extends once feasibility review, structural assessment, drainage design, product ordering, and scheduling are included.
Conversions that keep plumbing in place or use an integrated shower pan may move faster than projects that require joist modifications, recessed subfloors, or custom linear drains. Timelines extend when structural work, complex tile layouts, frameless glass, or specialty waterproofing membranes are required.
A curbless shower timeline can also be affected by:
- Existing floor structure and ability to recess or notch framing
- Whether adjacent bathroom flooring must be re-leveled for a flush transition
- Relocation of plumbing lines or drain position
- Permit and inspection requirements
- Availability and lead times for linear drains and waterproofing systems
- Custom shower pan fabrication
- Tile layout complexity and pre-slope needs
- Templating, fabrication, and scheduling for frameless glass
- Hidden issues uncovered during demolition, such as rot or prior leaks
- Sequencing among tile setters, plumbers, waterproofing installers, and glass crews
Instead of focusing only on on-site days, consider the full lifecycle. Thorough planning—especially for slope-to-drain and membranes—helps prevent rushed decisions, waterproofing delays, and costly changes once work begins.


Initial Consultation and Curbless Feasibility Review
The curbless process starts with a conversation about your home, accessibility goals, and how you want the shower to perform day to day.
During the initial consultation, Simone Feldman Designs evaluates the bathroom and discusses site-specific factors: desired drain style, preferred glass configuration, whether the floor can be recessed for a flush transition, how water will be contained, and what maintenance level you prefer.
This is also the time to define scope. Homeowners should be prepared to share:
- Inspiration photos and preferred shower style
- Must-have features like a linear drain, benches, or grab bars
- Household needs, including children, guests, or aging‑in‑place priorities
- Budget expectations
- Whether the existing footprint will remain
- Any known leaks, moisture concerns, or subfloor issues
- A desired completion window, if applicable
Clear expectations early help determine if a recessed subfloor, pre-slope build, or thin-profile pan is best—and which choices deliver the most comfort, safety, and long-term durability.
Existing Conditions Survey Pre-Slope and Drain Layout
Before tile, fixtures, or glass are selected, the shower needs a technical plan. This phase reviews room dimensions, joist direction and depth, drain location options, ceiling height, water containment strategy, and any structural limitations.
Curbless planning goes beyond where the shower fits. It addresses how water moves, how the main floor transitions into the shower, and how the space functions for daily use and accessibility.
A well-designed curbless plan may consider:
- Pre-slope requirements and finished slope-to-drain
- Linear versus point drain location and flow capacity
- Clear opening for ADA-friendly entry and maneuvering
- Glass panel size, swing, and deflection control
- Bench placement and niche height clear of spray
- Water containment strategies without a threshold
- Natural light and privacy with glass or window placement
- Heated floor zones and transition detailing
- Outlet and control locations outside the wet zone
- Exhaust fan placement to manage moisture
- Future mobility needs and grab bar blocking
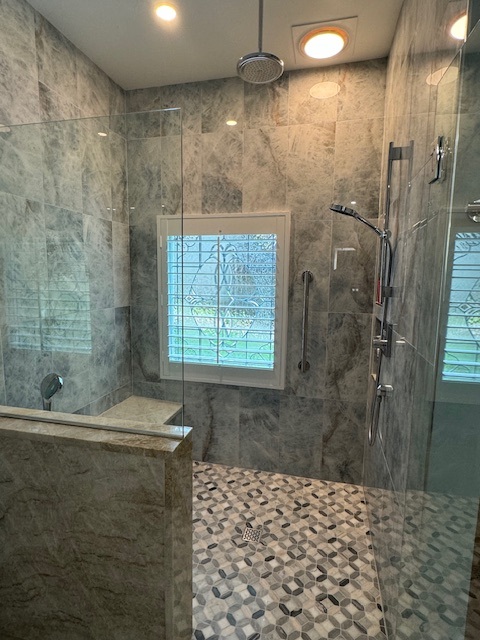
In compact baths, careful slope and a linear drain along the back wall can create a spacious, barrier-free feel without moving walls. In larger primary suites, plans may include a wider entry, a bench, multiple heads, and a frameless enclosure that keeps the floor continuous.
Simone Feldman Designs uses 3D visualization to show how the curbless transition, drain placement, and glass will look before construction, helping clients understand scale, movement, and water paths prior to committing.
Specifying Waterproofing Membranes Drains and Frameless Glass
With layout and drainage resolved, the design moves into selections that impact performance and appearance—especially the waterproofing system.
Selections may include:
- Integrated shower pan or mortar bed with membrane
- Linear or point drain and grate style
- Thermostatic valve and shower trim
- Bench, niche, and blocking hardware
- Toilet and accessory updates, if included
- Floor and wall tile suited for slope and traction
- Niche accents and grout type
- Mirrors and storage solutions
- Lighting suitable for wet zones
- Exhaust fan specification
- Transition profiles for seamless floor-to-shower entry
- Grab bars and accessories
- Frameless shower glass and hardware
Every choice should support drainage, waterproofing, and maintenance. For example, mosaic tile may improve traction on sloped floors, while large-format tile pairs well with linear drains. Frameless glass must be sized to limit splash yet preserve clear, accessible entry.
Many components—linear drains, custom pans, glass, and specialty membranes—carry lead times. Ordering early keeps the schedule on track and allows proper flood testing before tile. Simone guides clients through waterproofing systems, tile, drains, glass, and fixtures, explaining long-term performance, cost, and availability.
Budgeting Procurement and Permit Coordination
With the curbless shower layout approved and finishes selected, Simone prepares detailed cost estimates, confirms the precise scope for a barrier-free installation, places orders, and builds a dependable schedule around drain systems, membranes, and specialty glass.
This step is critical because linear drains, waterproofing systems, and frameless glass often have lead times that determine when demolition can start. Tearing out the existing shower before these components are confirmed can extend the time your bath is out of service.
Depending on the curbless shower design, the planning stage may include:
- Confirming labor and installation costs
- Ordering drains, waterproofing systems, tile, fixtures, lighting, and glass
- Reviewing product lead times
- Coordinating specialty materials
- Finalizing plans for plumbing, slope-to-drain, and electrical work
- Scheduling trades
- Applying for permits, when required
- Preparing for inspections
- Establishing a construction start date
Permits may be required when a curbless shower involves relocating drains, adjusting floor framing for pre-slope, modifying electrical circuits for lighting or heated floors, or other work governed by local codes. Plan review and inspections can influence timing, especially when structural or plumbing adjustments are necessary for a zero-threshold transition.
At Simone Feldman Designs, project planning includes coordinating tile setters, waterproofing specialists, plumbers, electricians, and glass fabricators, while verifying that each construction decision supports proper slope, drainage, accessibility, and the approved aesthetic.
Jobsite Prep Protection and Access Planning
Before work begins on a curbless shower, prepare for short-term routine changes. If the space is your only full bath, it’s wise to set up an alternate plan for daily showering and storage since waterproofing and flood testing add time to the schedule.
Preparation may include:
- Removing personal toiletries, medications, towels, and décor
- Clearing nearby hallways and access paths
- Relocating fragile items from adjacent rooms
- Creating a temporary grooming station elsewhere in the home
- Planning bathroom use around water shutoffs
- Discussing pet access and household schedules
- Protecting furniture or belongings near the work area
- Confirming parking, entry, and access expectations with the project team
Construction brings noise, dust, foot traffic, and brief utility interruptions. Your team should explain how long pre-slope work, membrane curing, and glass fabrication typically take, who will be on site, and what to expect as the curbless pan, linear drain, and transitions to the bathroom floor are completed.
Simone remains closely involved throughout construction, visits job sites regularly, and keeps clients informed about sequencing for slope creation, waterproofing, inspections, and any adjustments that may affect the anticipated timeline.
Demolition Subfloor Modifications and Rough-In Work
Demolition marks the start of making room for a true zero-threshold entry. Existing shower curbs, tile, flooring, and sometimes subfloor layers are removed so the team can recess the pan and create a continuous, code-compliant slope to the drain.
Once the space is opened, the team may uncover conditions like past water intrusion, mold, undersized or notched joists, uneven subfloors, outdated plumbing, or previous shower assemblies without proper waterproofing.
Not every project encounters these findings, but allowing contingency in budget and time helps address framing corrections, drain relocations, or substrate leveling so the new curbless system performs as intended.
After demolition, rough construction may include:
- Framing changes
- Plumbing rough-in work
- Electrical wiring and outlet placement
- Ventilation ducting
- Blocking for grab bars, accessories, cabinets, or shower glass
- Shower pan preparation
- Wall repairs or replacement
- Subfloor repairs and leveling
This phase is crucial because proper recessing of the floor, accurate slope-to-drain, and robust backing for frameless glass and accessories determine long-term waterproofing integrity, accessibility, and comfort.
Waterproofing Membrane Pre-Slope Pan and Flood Testing
For curbless showers, waterproofing is non-negotiable. Because the wet area flows seamlessly into the bathroom floor, the assembly must include a continuous membrane, correct pre-slope, and carefully detailed transitions to keep water contained and directed to the drain.
Depending on the bathroom design, this phase may involve:
- Installing a waterproof shower pan or system
- Preparing shower walls
- Applying waterproofing membranes
- Conducting flood testing when appropriate
- Installing floor tile
- Setting wall tile and shower tile
- Grouting and sealing materials as needed
- Installing a vanity and countertop
- Completing flooring transitions
- Painting walls and ceilings
Tile work for a curbless design can take longer because slopes must be precise and transitions exact. Linear drains, mosaics at the slope, benches, and niches require careful layout so water sheds properly and movement joints align with manufacturer guidelines.
Simone Feldman Designs coordinates experienced installers and verifies that membranes are continuous, corners are reinforced, flood tests pass, and the finished tile plane supports a safe, attractive, and truly barrier-free shower.
Set Linear Channel Drain Tile Install and Trim-Out
After the waterproofed surfaces are complete, your bathroom begins to function like a finished space. This step brings in visible components that complete the curbless shower experience.
Typical finishing work may include:
- Installing faucets, shower trim, and toilets
- Hanging mirrors and light fixtures
- Connecting sinks and drains
- Installing cabinet hardware
- Mounting accessories
- Installing shower glass
- Completing paint touch-ups
- Testing lights, outlets, fans, drains, and plumbing fixtures
- Cleaning the space for final review
Custom frameless panels for a curbless shower are typically measured after tile is complete to ensure exact clearances and splash control, so fabrication and installation occur near the end of the project—this is expected and planned for in the schedule.
Fixtures Seals Transitions and Final Details
The final walkthrough confirms that the curbless shower drains correctly, finishes are complete, glass is aligned, and controls are placed for comfortable use. It’s the time to validate performance and review maintenance.
During the final review, homeowners should understand:
- How to operate plumbing fixtures and exhaust fans
- How to care for countertops, tile, grout, and specialty surfaces
- Whether any materials require sealing or specific cleaners
- How to maintain shower glass and hardware
- What warranty information applies to products or workmanship
- Which final touch-ups or punch-list items, if any, remain
A thorough walkthrough ensures you feel confident using and caring for your barrier-free shower, from day one.
What Can Change the Schedule or Scope
Curbless shower projects have unique variables. Even with careful planning, discoveries during demolition, product availability, inspection timing, or scope changes can shift the schedule.
Common reasons a curbless shower may take longer include:
- Changes to the scope after work begins
- Delayed drains, waterproofing systems, tile, lighting, or plumbing fixtures
- Backordered or damaged materials
- Custom fabrication timelines for linear drains, benches, or shower glass
- Permit and inspection scheduling
- Hidden plumbing, framing, moisture, or electrical issues
- Structural adjustments to recess the pan and establish pre-slope
- Complex tile layouts for slope-to-drain or large-format materials
- Weather-related scheduling challenges for certain deliveries or exterior access needs
- Homeowner selection changes during construction
You can reduce delays by finalizing selections early, ordering critical components before demolition, allowing a realistic contingency for framing and waterproofing corrections, and partnering with Simone to coordinate the project from planning through final completion.
Plan Your Curbless Shower With Confidence
A curbless shower transforms daily use with safer access, a seamless floor, and a modern look—when it’s engineered correctly. Success depends on more than speed. It requires careful planning for slope-to-drain, precise framing modifications, reliable waterproofing, and expert installation that protects adjacent flooring and maintains proper clearances for easy movement.
Simone Feldman Designs guides homeowners in Roswell, Atlanta, and nearby neighborhoods through every step of a curbless shower conversion. With 40+ years in residential renovations, Simone personally oversees pre-slope design, linear drain selection, waterproofing membrane specifications, contractor coordination, site supervision, and clear client communication to ensure a dry, durable, and beautiful result.
If you’re exploring a curbless shower—whether in a primary bath, condo, or older home—contact Simone Feldman Designs to schedule a consultation and develop a realistic plan for drainage, waterproofing, and finishes that fit your space.