Space-Savvy Small Bathroom Remodel: What to Expect
Explore how a small bathroom remodel progresses—from smart space planning and ordering compact fixtures to efficient installation and the final walkthrough. Contact Simone Feldman Designs today.
Start-to-Finish Overview for Compact Bath Upgrades
A successful small bathroom transformation starts long before demo day. The most efficient projects begin weeks—or even months—ahead with precise measurements, layout strategy for tight footprints, product selections sized for compact spaces, ordering, scheduling, and coordination among specialized trades.
For homeowners in Roswell, Atlanta, and nearby neighborhoods, understanding how a small bath remodel is sequenced minimizes stress and helps you plan around a single household bath. While every space is unique, a professionally managed project typically follows predictable stages: consultation, space-efficient design, product selections, ordering, permitting when required, construction, installation, and a final review.
Simone Feldman Designs supports you at each step. With more than 40 years in renovation and design, Simone provides meticulous planning, hands-on oversight, and clear communication tailored to compact bathrooms in bungalows, condos, and row homes. As a Certified Kitchen and Bath Designer (CKBD) and Certified Aging-in-Place Specialist (CA
Typical Duration for a Space-Maximizing Mini Bath
While construction in a compact bath can move efficiently, the full timeline often extends with planning, design development, right-sized product sourcing, and scheduling.
Updates that keep the existing layout and use stock-sized components can finish faster than projects that add pocket doors, relocate plumbing for a wall-hung toilet, integrate recessed storage, or require custom, shallow-depth cabinetry. Layout adjustments in tight footprints demand additional coordination to preserve clear floor area and accessible pathways.
A small bathroom remodeling timeline can also be affected by:
- The size and current condition of the small bath
- Whether multiple bathrooms are being remodeled
- If doorways will convert to pocket or barn doors
- Plumbing or electrical relocation for wall-hung or corner fixtures
- Permit and inspection requirements
- Product availability and lead times
- Custom compact vanity or storage fabrication
- Tile complexity and waterproofing requirements
- Shower glass fabrication and installation scheduling
- Hidden conditions discovered during demolition
- The availability and sequencing of skilled trades
Instead of counting only on-site days, look at the entire lifecycle. Upfront planning specific to small spaces helps avoid last-minute product swaps, sequencing delays, and costly changes after work begins—keeping your compact bath usable sooner.


Phase 1 Needs Assessment and Layout Goals
The small bathroom remodeling journey begins with a conversation about your home, goals, budget, and the everyday constraints you face in a tight footprint.
During the initial consultation, Simone Feldman Designs evaluates how the space is currently used and identifies opportunities to free floor area. Common topics include door swing conflicts, lack of countertop landing zones, insufficient shallow storage, a vanity that’s too deep, cramped circulation, or fixtures that dominate the room.
This stage is also the time to define scope. Homeowners should be prepared to share:
- Inspiration images and style preferences
- A list of must-have features
- Household needs, including children, guests, or aging-in-place goals
- Budget expectations
- Whether the bathroom will remain in its current footprint
- Whether there are known leaks, moisture problems, or repair concerns
- A desired completion window, if one exists
Early, realistic dialogue clarifies expectations and highlights which space-maximizing choices—like a floating vanity or pocket door—will bring the biggest improvement in comfort and function.
Phase 2 Measuring Constraints and Clear Floor Area Planning
Before choosing finishes, a compact bath needs a plan that prioritizes clearances and storage. This phase reviews room dimensions, door and window locations, existing plumbing, ceiling height, light reflectance opportunities, storage depth, and any structural limits.
Planning in a small bathroom goes beyond where fixtures fit. It considers how people move, the clear floor area at key points, and how reflective surfaces and larger tile can visually expand the room.
A well-designed compact bath plan may consider:
- Door swing vs. pocket or barn door options
- Privacy at the toilet, including wall-hung solutions
- Vanity width, narrow depth, and drawer configuration
- Shower dimensions, glass panel location, and entry
- Tub placement, if applicable
- Clearances for movement in tight zones
- Natural light, mirror-to-window bounce, and reflectivity
- Recessed and shallow-depth storage opportunities
- Electrical outlet placement for compact vanities
- Exhaust fan placement and ventilation routing
- Task lighting at the mirror and general illumination
- Accessibility and future mobility needs
In many small bathrooms, strategic moves—like a corner sink, wall-hung toilet, floating vanity, recessed medicine cabinet, oversized tile to reduce grout lines, and light color palettes—can make the room feel larger without moving walls.
For a primary suite’s compact bath, the plan may include dual-use solutions, such as a wider floating vanity with open toe clearance, a frameless glass panel to preserve sightlines, or built-in linen niches between studs.
Simone Feldman Designs uses 3D imaging to illustrate scale, fixture placement, and material combinations, helping you visualize how pocket doors, wall-hung fixtures, and reflective surfaces work together before construction begins.
Phase 3 Selecting Space-Saving Fixtures and Finishes
With layout set, design development focuses on right-sizing every element for a compact footprint and choosing materials that amplify light and space.
Selections may include:
- Compact vanity cabinetry and hardware
- Countertop material
- Corner or narrow-depth sink and faucet
- Shower system and trim
- Bathtub, if included
- Toilet, including wall-hung options
- Large-format tile to minimize grout lines
- Shower niche tile and accent materials
- Grout color
- Mirror and recessed medicine cabinet
- Lighting fixtures
- Exhaust fan
- Flooring transitions
- Towel bars, toilet paper holders, and other accessories
- Shower glass style and hardware
Each choice should support the space plan, budget, and maintenance needs. For instance, a floating vanity and wall-hung toilet increase visible floor, oversized tile reduces visual clutter, and high light reflectance finishes make the room feel brighter. Glass panels maintain sightlines, while shallow-depth cabinetry and recessed storage preserve clear floor area.
Ordering compact and custom pieces early helps avoid lead-time delays. Items like wall-hung carriers, specialty glass, large-format tile, and shallow-depth vanities may require advance fabrication. Securing them before construction keeps the schedule on track.
Simone guides homeowners through cabinetry, tile, countertop, fixture, lighting, and storage decisions, explaining performance over time and how each selection supports a more open, highly functional small bathroom.
Phase 4 Budgeting, Orders, and Permits for Tight Spaces
For small bathroom remodeling, precise planning prevents lost weeks in a tight space. Once your compact layout, storage strategy, and fixture selections are set, Simone refines the estimate, validates the scope, places time-sensitive orders, and builds a dependable schedule that aligns with material lead times.
In petite baths, a single missing part—like a wall-hung toilet carrier or a pocket door frame—can stall everything. Confirming availability before demolition keeps your only bath usable as long as possible and shortens the period without a working sink or toilet.
Depending on the project, the planning stage may include:
- Confirming labor and installation costs
- Ordering cabinets, tile, fixtures, lighting, and countertops
- Reviewing product lead times
- Coordinating specialty materials
- Finalizing plans for plumbing and electrical work
- Scheduling trades
- Applying for permits, when required
- Preparing for inspections
- Establishing a construction start date
Permits for small baths are often required when relocating fixtures to free floor space, adding wall-hung supports, or moving electrical for slim-profile lighting. Local reviews and inspections can shape the schedule, so Simone sequences tasks to keep momentum even when approvals are needed.
At Simone Feldman Designs, project planning includes coordinating the right trades for the work and ensuring that construction decisions align with the approved design. Simone works closely with carpenters, plumbers, electricians, tile installers, and other trusted residential professionals throughout the renovation process.
Phase 5 Home Prep for Dust Control in Small Quarters
Compact bathrooms serve big daily needs, so a smooth setup matters. If this is your only full bath, arrange a short-term plan for showers and morning routines. Clearing adjacent hallways ensures crews can maneuver long tile, glass panels, and pocket door frames without damaging walls.
Preparation may include:
- Removing personal toiletries, medications, towels, and décor
- Clearing nearby hallways and access paths
- Relocating fragile items from adjacent rooms
- Creating a temporary grooming station elsewhere in the home
- Planning bathroom use around water shutoffs
- Discussing pet access and household schedules
- Protecting furniture or belongings near the work area
- Confirming parking, entry, and access expectations with the project team
Expect dust and noise as partitions open for pocket doors, in-wall carriers, and recessed storage. A professional team should outline who is on site and when, plus how long you’ll be without fixtures, so your household can plan around utility interruptions.
Simone remains closely involved throughout construction, visits job sites regularly, and keeps clients informed about what is happening, what comes next, and any changes that may affect the project schedule.
Phase 6 Demo and Rough-In with Pocket/Barn Door Framing
Demolition in a small bathroom is surgical. Fixtures, shallow vanities, flooring, and selective drywall come out to make room for space savers like corner sinks, floating vanities, and pocket doors that increase clear floor area.
Opening the walls may reveal issues common in older condos and bungalows: dated supply lines, moisture at tub surrounds, uneven subfloors, or cramped wiring that limits slim recessed storage. These discoveries inform smart fixes before new compact fixtures go in.
Not every project encounters surprises, but a contingency for time and cost helps ensure problems are corrected, not concealed—critical in tight rooms where every inch must perform.
After demolition, rough construction may include:
- Framing changes
- Plumbing rough-in work
- Electrical wiring and outlet placement
- Ventilation ducting
- Blocking for grab bars, accessories, cabinets, or shower glass
- Shower pan preparation
- Wall repairs or replacement
- Subfloor repairs and leveling
This is where space-maximizing features are built: framing for a pocket or barn door, blocking for a wall-hung toilet, and cavities for recessed niches. The behind-the-wall work determines durability and frees floor space for a room that feels larger than its footprint.
Phase 7 Waterproofing, Oversized Tile, and Surface Prep
In compact bathrooms, moisture control is non-negotiable. Proper waterproofing behind tile protects tight assemblies where walls, niches, and corners are close together, and helps prevent issues that can quickly spread across a small footprint.
Depending on the bathroom design, this phase may involve:
- Installing a waterproof shower pan or system
- Preparing shower walls
- Applying waterproofing membranes
- Conducting flood testing when appropriate
- Installing floor tile
- Setting wall tile and shower tile
- Grouting and sealing materials as needed
- Installing a vanity and countertop
- Completing flooring transitions
- Painting walls and ceilings
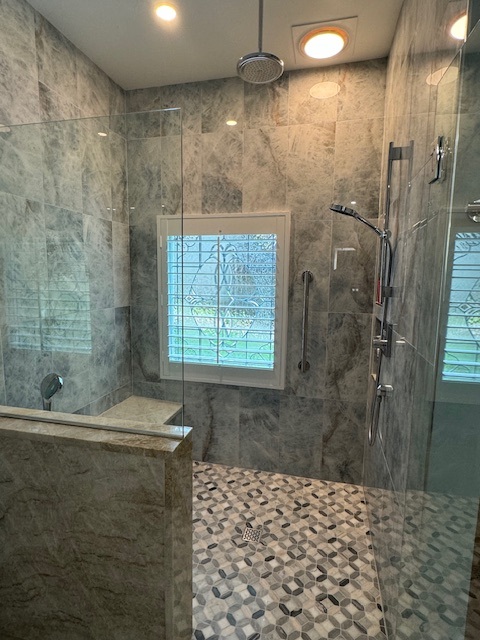
To make small rooms feel larger, Simone often specifies oversized tile to reduce grout lines and maintain a calmer visual field. Light, high-LRV finishes and a floating vanity help bounce light, while a single glass panel minimizes visual breaks compared to framed enclosures.
Simone Feldman Designs oversees the work of skilled tile installers and other trades, reviewing details to confirm that the finished bathroom reflects the approved design and that important hidden components, including waterproofing infrastructure, are completed correctly.
Phase 8 Install Wall-Hung Toilet, Floating Vanity, and Glass Panel
As surfaces wrap up, compact fixtures bring the layout to life. Choosing wall-hung toilets, corner sinks, and narrow-depth storage frees clear floor area and improves daily circulation in tight rooms.
Typical finishing work may include:
- Installing faucets, shower trim, and toilets
- Hanging mirrors and light fixtures
- Connecting sinks and drains
- Installing cabinet hardware
- Mounting accessories
- Installing shower glass
- Completing paint touch-ups
- Testing lights, outlets, fans, drains, and plumbing fixtures
- Cleaning the space for final review
Custom glass is commonly measured after tile is set. In small baths, this ensures alignments are tight and the panel lines remain minimal, preserving a clean, open look without crowding the shower area.
Phase 9 Punch List, Mirror-to-Window Bounce, and Handover
The walkthrough verifies that space-saving goals were met and that everything operates as intended. Together, we confirm clearances, cabinet and niche access, and that wall-hung elements are secure and level.
During the final review, homeowners should understand:
- How to operate plumbing fixtures and exhaust fans
- How to care for countertops, tile, grout, and specialty surfaces
- Whether any materials require sealing or specific cleaners
- How to maintain shower glass and hardware
- What warranty information applies to products or workmanship
- Which final touch-ups or punch-list items, if any, remain
You’ll also receive tips for keeping small baths feeling open—like using reflective surfaces and streamlined accessories—so your remodeled room stays bright, functional, and easy to navigate from day one.
What Can Speed Up or Slow Down a Compact Bath Remodel
Small bathroom remodeling has unique variables. Tight footprints mean any delay—like a late pocket door frame or a wall-hung carrier—can hold up multiple trades. Discovery behind walls or inspection timing can also extend schedules.
Common reasons a bathroom remodel may take longer include:
- Changes to the scope after work begins
- Delayed cabinetry, tile, lighting, or plumbing fixtures
- Backordered or damaged materials
- Custom fabrication timelines for cabinets, countertops, or shower glass
- Permit and inspection scheduling
- Hidden plumbing, framing, moisture, or electrical issues
- Structural repairs
- Complex tile patterns or custom shower features
- Weather-related scheduling challenges for certain deliveries or exterior access needs
- Homeowner selection changes during construction
To keep momentum, Simone recommends locking selections early, ordering space-critical items first (pocket/barn doors, wall-hung carriers, compact vanities), and maintaining a realistic contingency. A tightly coordinated plan helps ensure your compact bath is back in service quickly.
Plan Your Space-Maximizing Small Bath with Confidence
Transforming a compact bath takes smart strategy, not just new finishes. A successful small bathroom remodel balances clear floor area, efficient storage, and visual openness. The right timeline prioritizes careful layout planning, precise rough-ins for pocket or barn doors, wall-hung fixtures anchored to reinforced walls, and meticulous waterproofing—followed by skillful installation of space-saving elements like corner sinks, shallow-depth vanities, and oversized tile to minimize grout lines.
Simone Feldman Designs delivers full-service small bathroom remodeling for homeowners in Roswell, Atlanta, and nearby neighborhoods—from bungalows in Historic Roswell to condos in Buckhead and townhomes along the BeltLine. With more than 40 years of residential renovation experience, Simone personally guides layout optimization, light and reflective surface strategy, compact fixture and material selection, contractor coordination, on-site supervision, and steady client communication so every inch works harder.
If you’re planning a small bathroom remodel, contact Simone Feldman Designs to schedule a consultation. We’ll map out a right-sized plan that frees up floor space, improves flow, and makes your bathroom feel bigger every day.